How to Install a Roof Vent Fan
Updated: April 1, 2020
For most DIY camper van enthusiasts, installing a roof vent fan is the first on a long list of must-have upgrades. Fans are great for keeping your van cool during the day, purging condensation and odor at night, and are vital for cooking purposes. Having said that, cutting into your new-to-you van can be intimidating–it certainly was for us! However, follow these simple steps and it’s sure to go smoothly. If you’re still searching for the perfect roof vent fan, check out our buying guide here.
a quick rundown of the process:
1. Roof Vent Fan Location – Decide on the ideal location for your roof vent fan and use a template to trace the opening.
2. Mark, Drill, and Cut – Drill a hole at each corner of the marked template and then cut around the perimeter with your jigsaw.
3. Prep and Clean – Smooth out the edges with your metal file, clean the roof, and apply primer paint to prevent future rust.
4. Weatherproofing and Fan Frame Installation – Install a layer of butyl tape around the perimeter of the fan frame, drop it into the opening, and seal it up.
5. Roof Vent Fan Installation – Install the roof vent fan into the opening and hook up the electrical. Check for issues and you're done!

The highly-rated MAXXFAN Deluxe (reviewed here) sharing roof real estate with a solar panel and awning.
Before you open up your camper van like a can of sardines, make sure you have everything you need–there’s nothing worse than driving to the hardware store in the middle of installation.
Must-Have Supplies
Roof Vent Fan (see our guide for the best roof vent fans)
Self-Leveling Lap Sealant
Butyl Tape
Painters Tape
Primer Spray Paint
Isopropyl Alcohol
2x1-inch Furring Strip
Black Sharpie
Must-Have Tools
Electric Jigsaw
Metal Jigsaw Blade
Electric Drill
Drill Bits
Metal File
Nice To Have Supplies and Tools
Moving Blankets (to keep the top of the van from getting scratched)
Plywood (To keep the top of the vent from denting)
Ladder
Metal Punch
Hammer
Five Steps to install a roof vent fan
Step One: Roof Vent Fan Location
While not initially obvious, choosing the best location for your camper van roof vent fan is fairly important. If you plan to do a lot of cooking in the van, consider installing it more towards the front where it can more effectively vent steam, smoke, and smells during meal time. On the flip side, if you have a longer wheelbase van and want to get the most out of your fan, considering placing it near the back of the cargo area. This rearward location optimizes airflow by pulling air through the entire length of your van. For the ultimate setup, consider installing one roof vent fan in the rear and another in the front. And while any of these options is great, we typically recommend a rearward location over the bed that’s still easily accessible while standing.

Testing out the location of the fan (don’t worry, we straightened up the final version)
Step Two: Mark, Drill, and Cut
2a. Mark
Make a simple cardboard cutout that’s the same size as your roof van fan–the box the fan shipped in works great–and use a black sharpie to trace the template on the roof of your van. Make sure it’s straight, square, and in line with the rest of your van.
2b. Drill
Drill holes at each corner of the template and ensure you make them large enough for your jigsaw blade to fit in. To make this process easier, consider using a metal punch to mark each location–this helps the bit stay in place and keeps it from getting off center when you start drilling. And to make it even easier on yourself, start with a very small bit before working your way up to the final and larger size–smaller drill bits are easier to manage and don’t grab the metal as bad.

Notice the smaller pilot hole before I moved up to the full-size bit–this makes the process a bit easier.
2c. Cut
Before jumping in with your jigsaw, use blue painters tape to mask off the perimeter of the cut lines. This keeps the saw from scuffing up your van, which can lead to rust down the road.
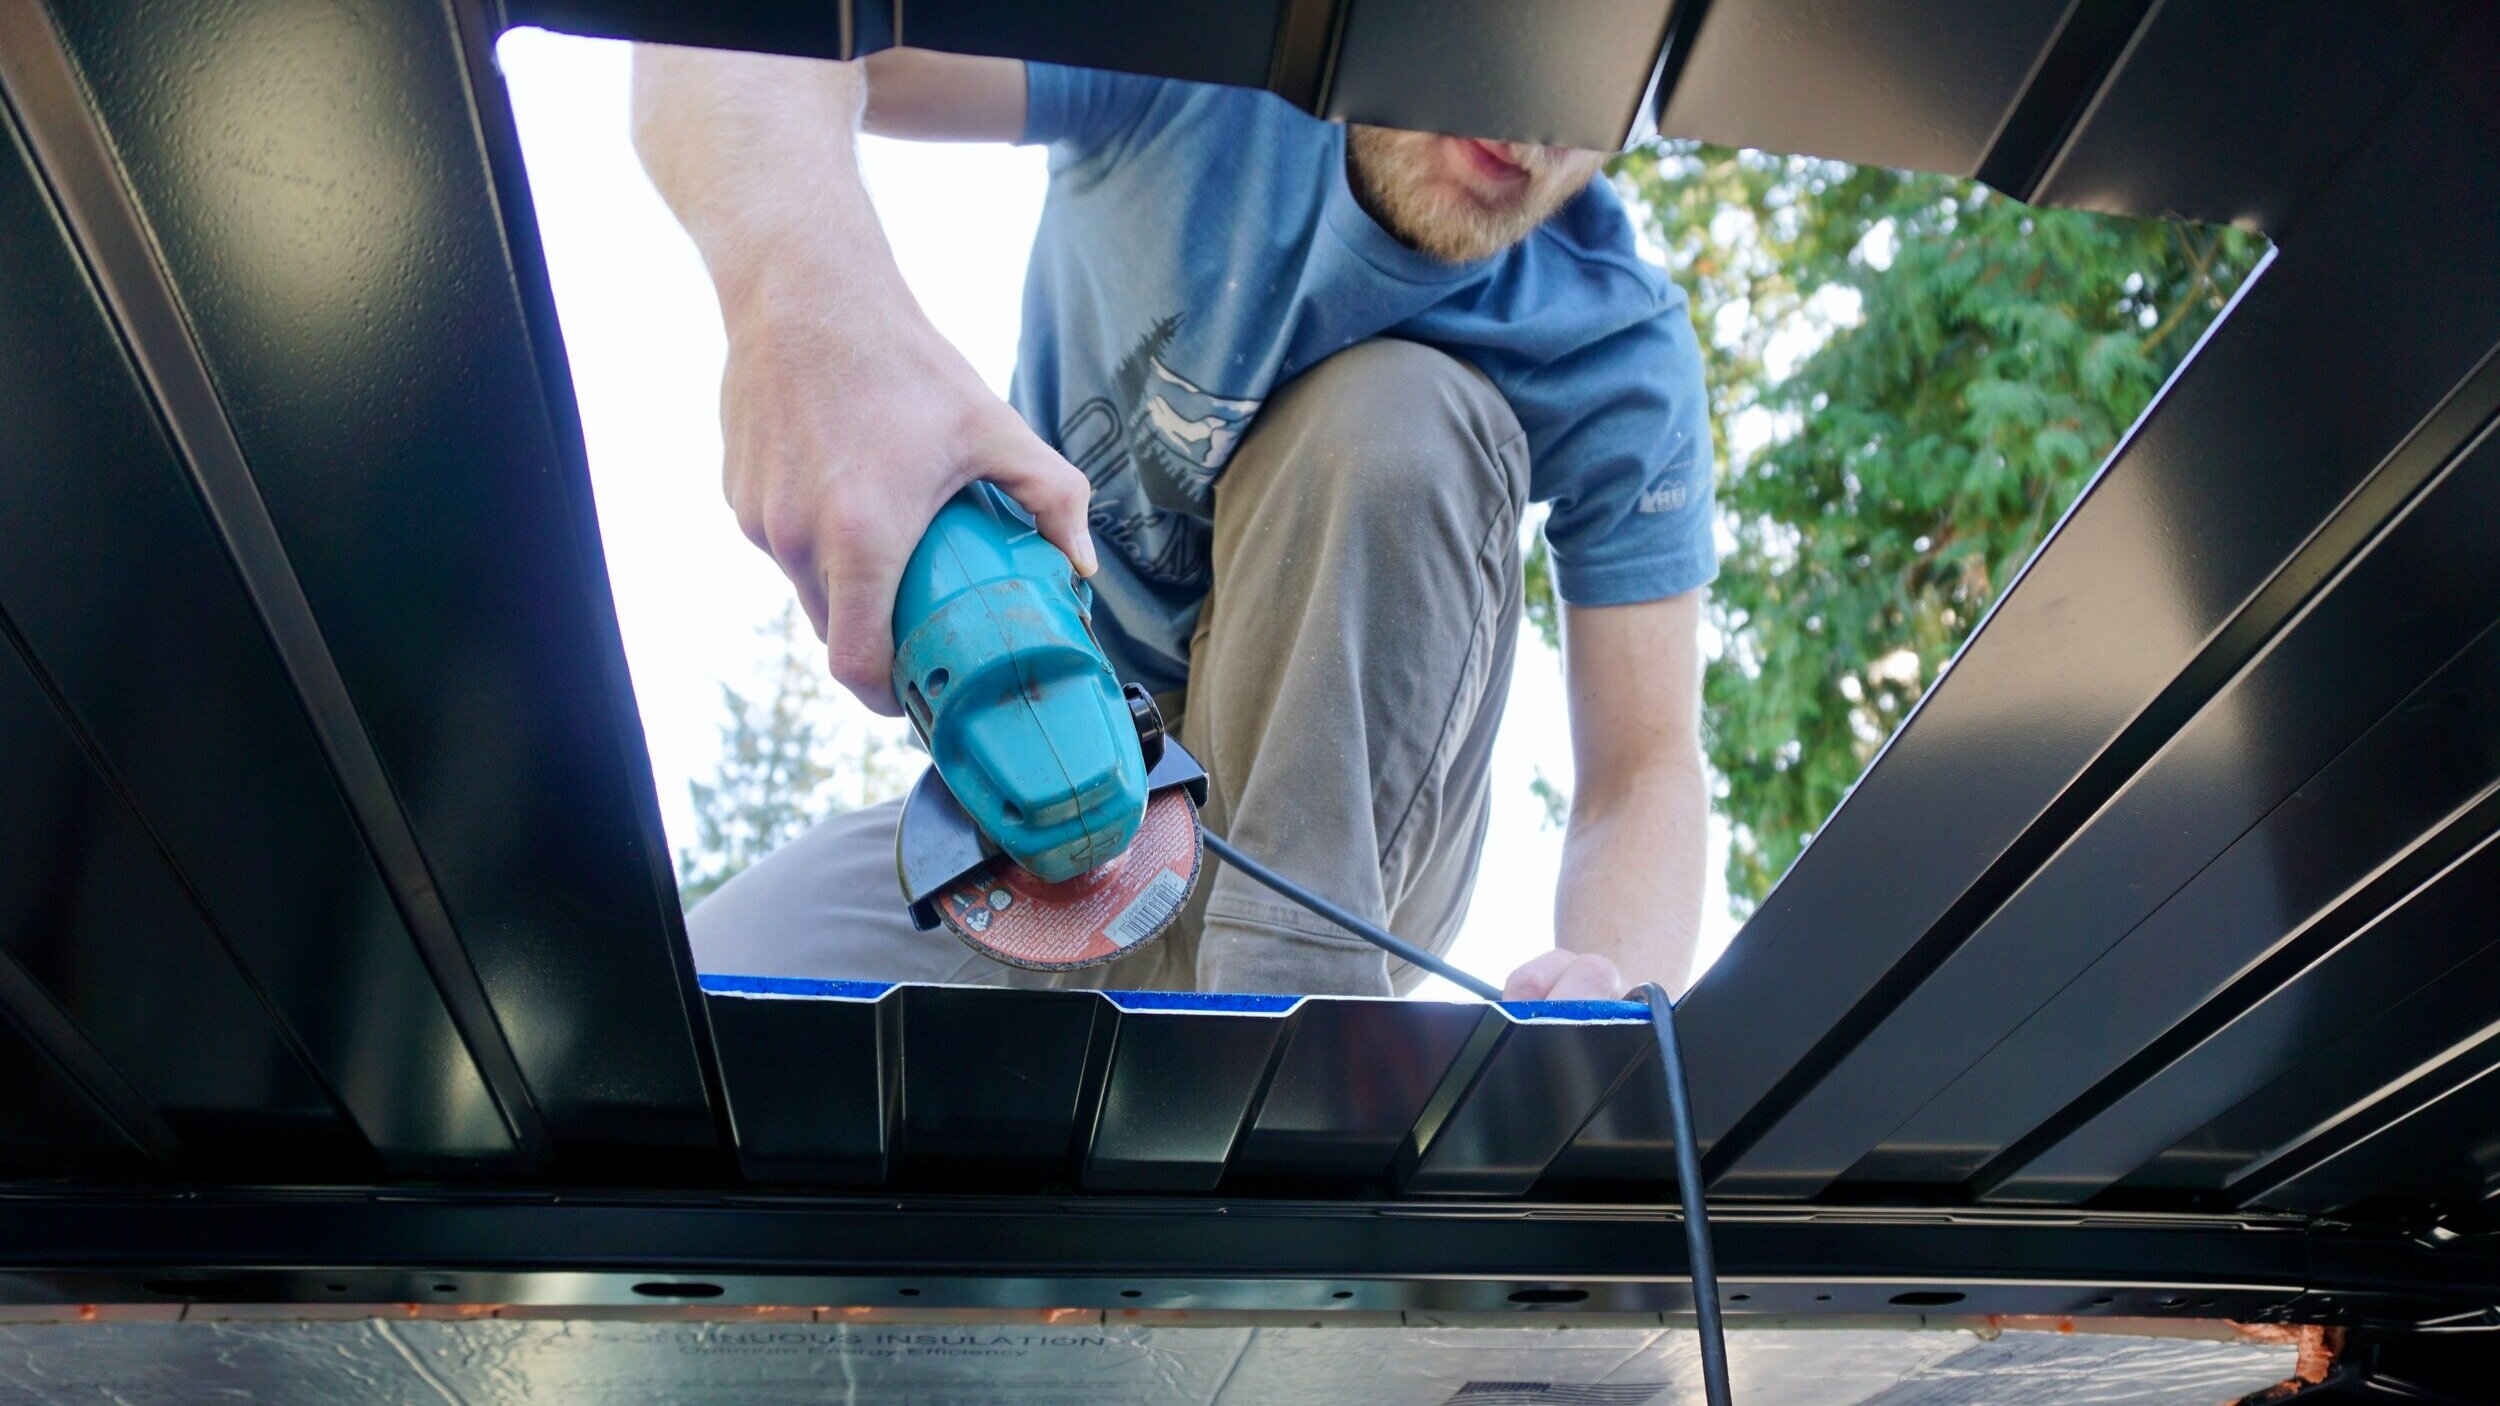
With your van taped off and a hole at each corner of the stencil, it’s time to start cutting. Use an electric jigsaw–make sure you have a blade suitable for metal–and cut along the template you traced. To get over the mental barrier of slicing into the roof of your van, we found it helpful to think of cutting one straight line at a time. For whatever reason, this made the task seem less daunting.

Cutting from one hole to the next is a fairly approachable task.
Step Three: Prep and Clean
With the piece of sheet metal removed, it’s time to prep and clean the area for the fan installation. To start, use a metal file to dull the edge of your cut and remove any metal burs–this ensures you don’t end up with metal slivers in your hand and also makes installing the fan a little bit easier. Once the edges are relatively smooth, clean the area with isopropyl alcohol and mask it off with your blue painters tape. Apply a couple of coats of primer to protect the metal from rust and you’re good to go.

Used here is a metal grinder to take off metal burs and smooth out the edges, but a metal file is just as capable.
Step Four: Weatherproofing and Fan Frame Installation
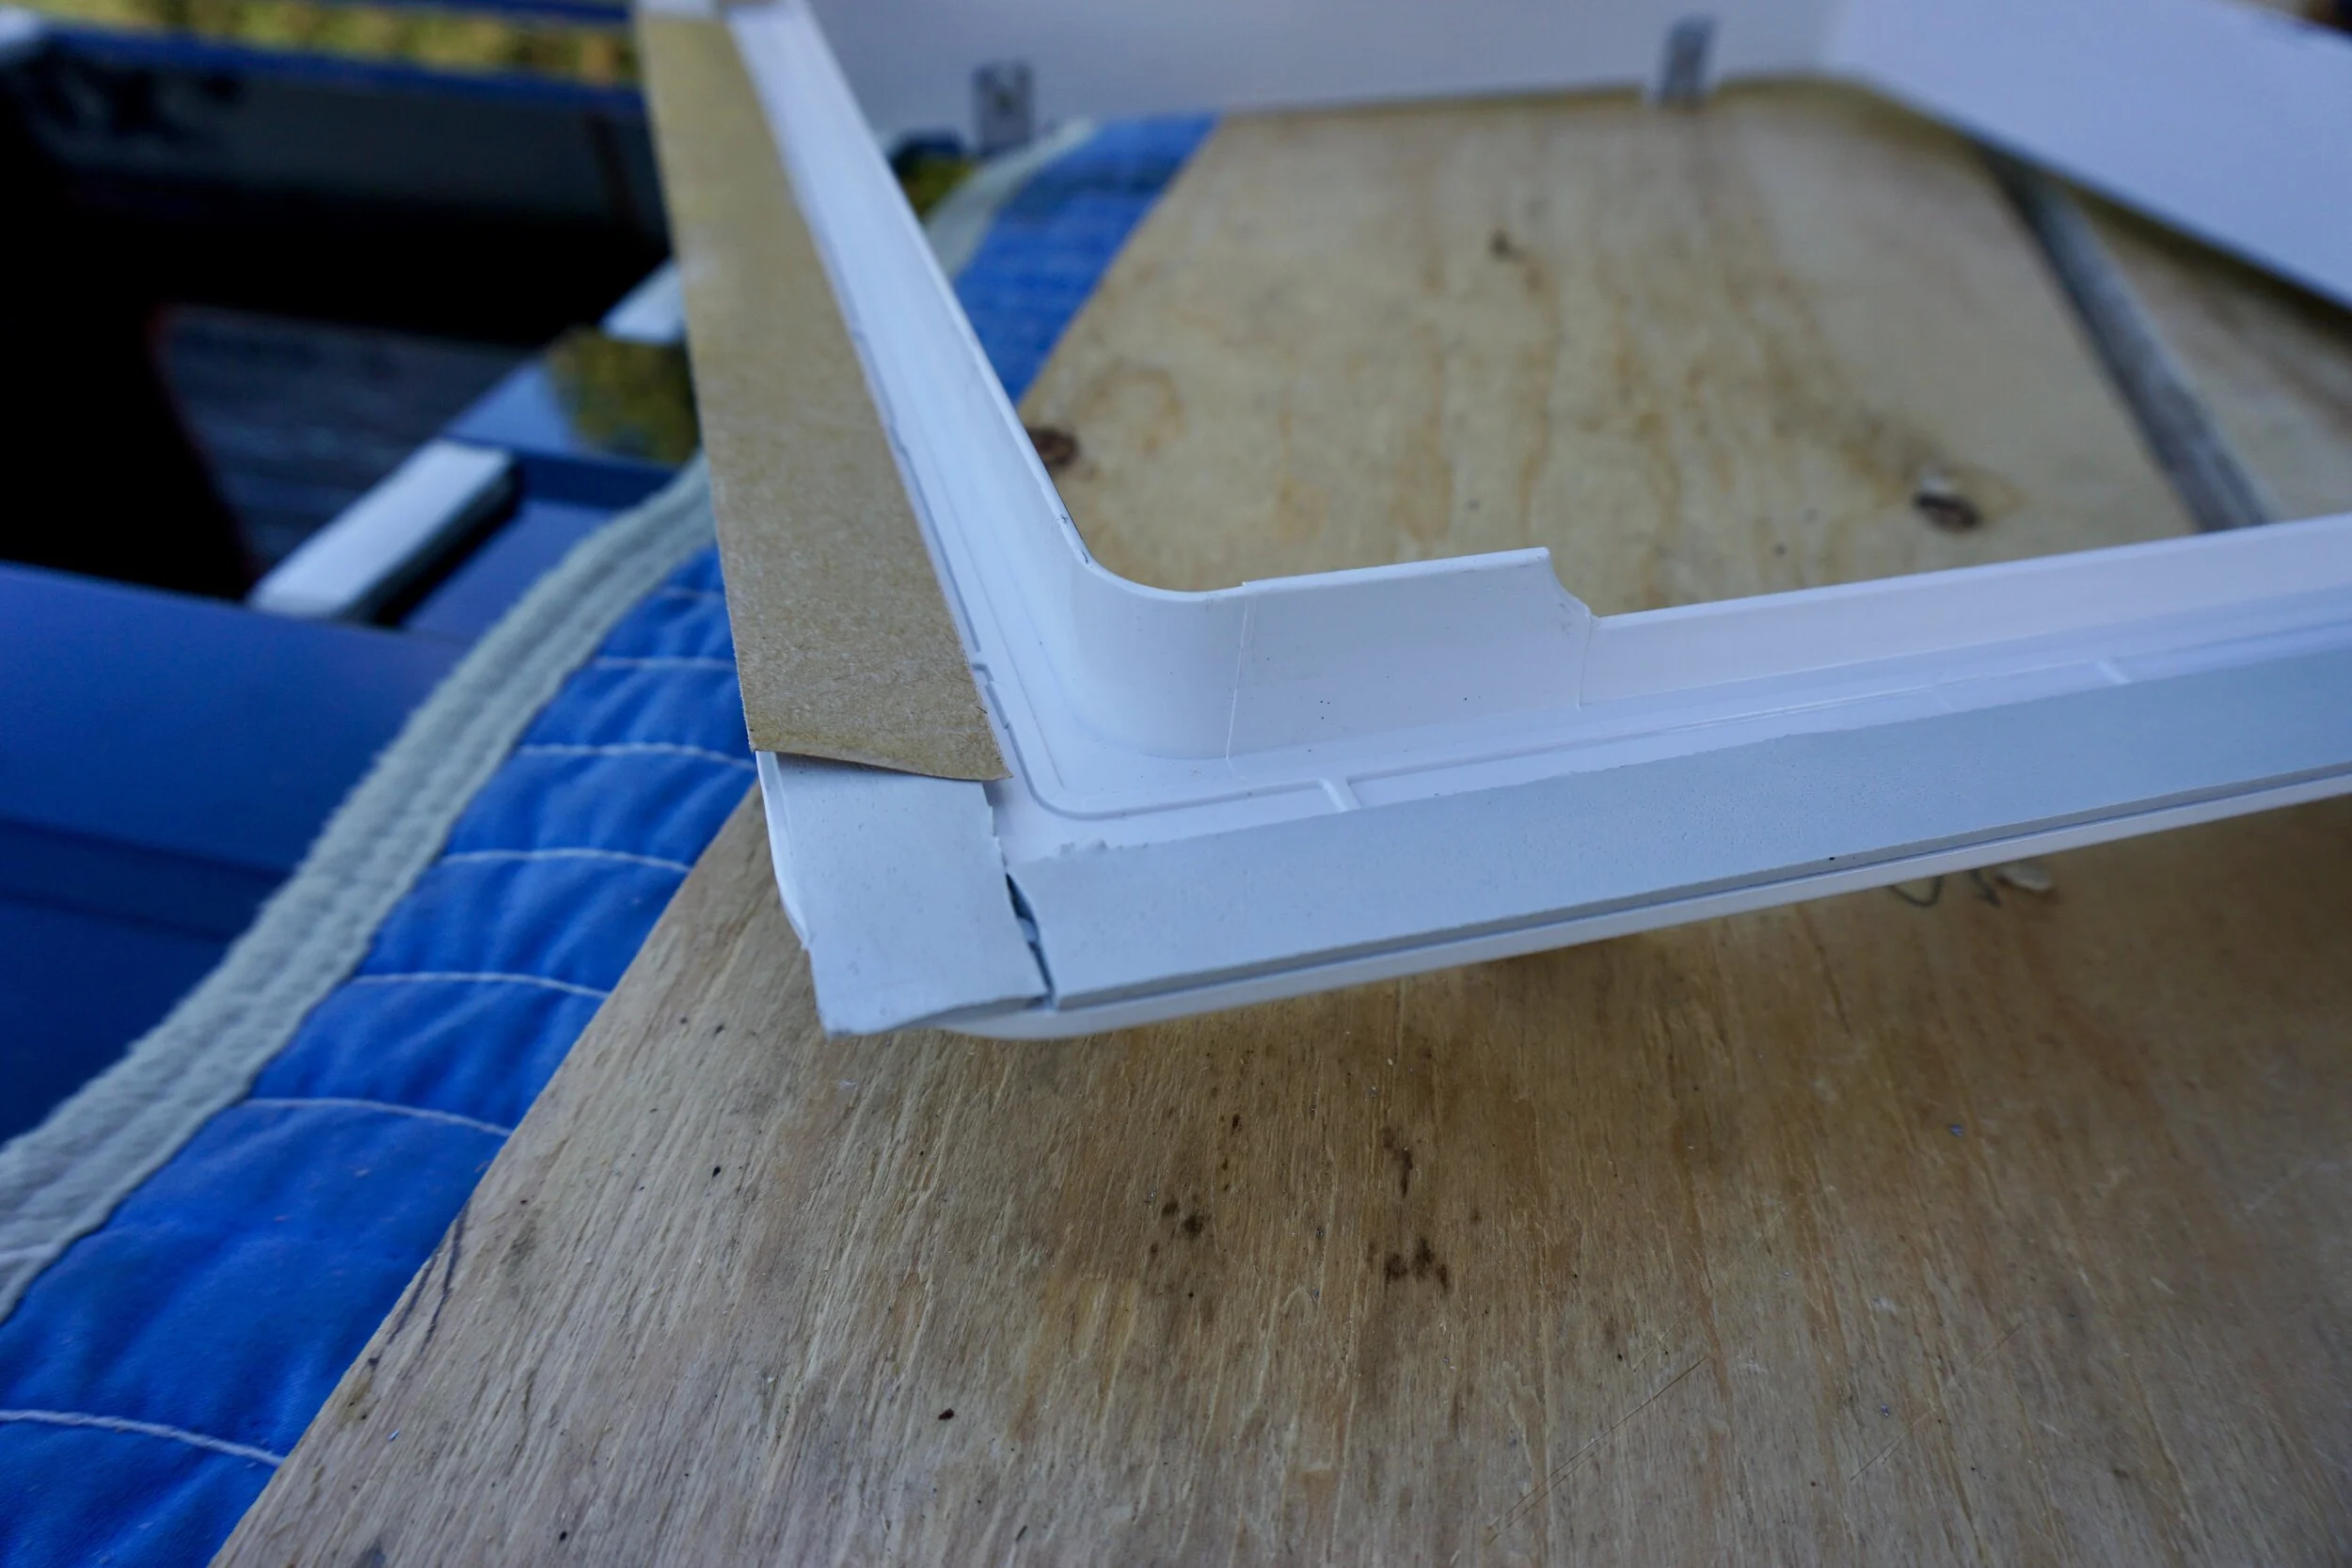
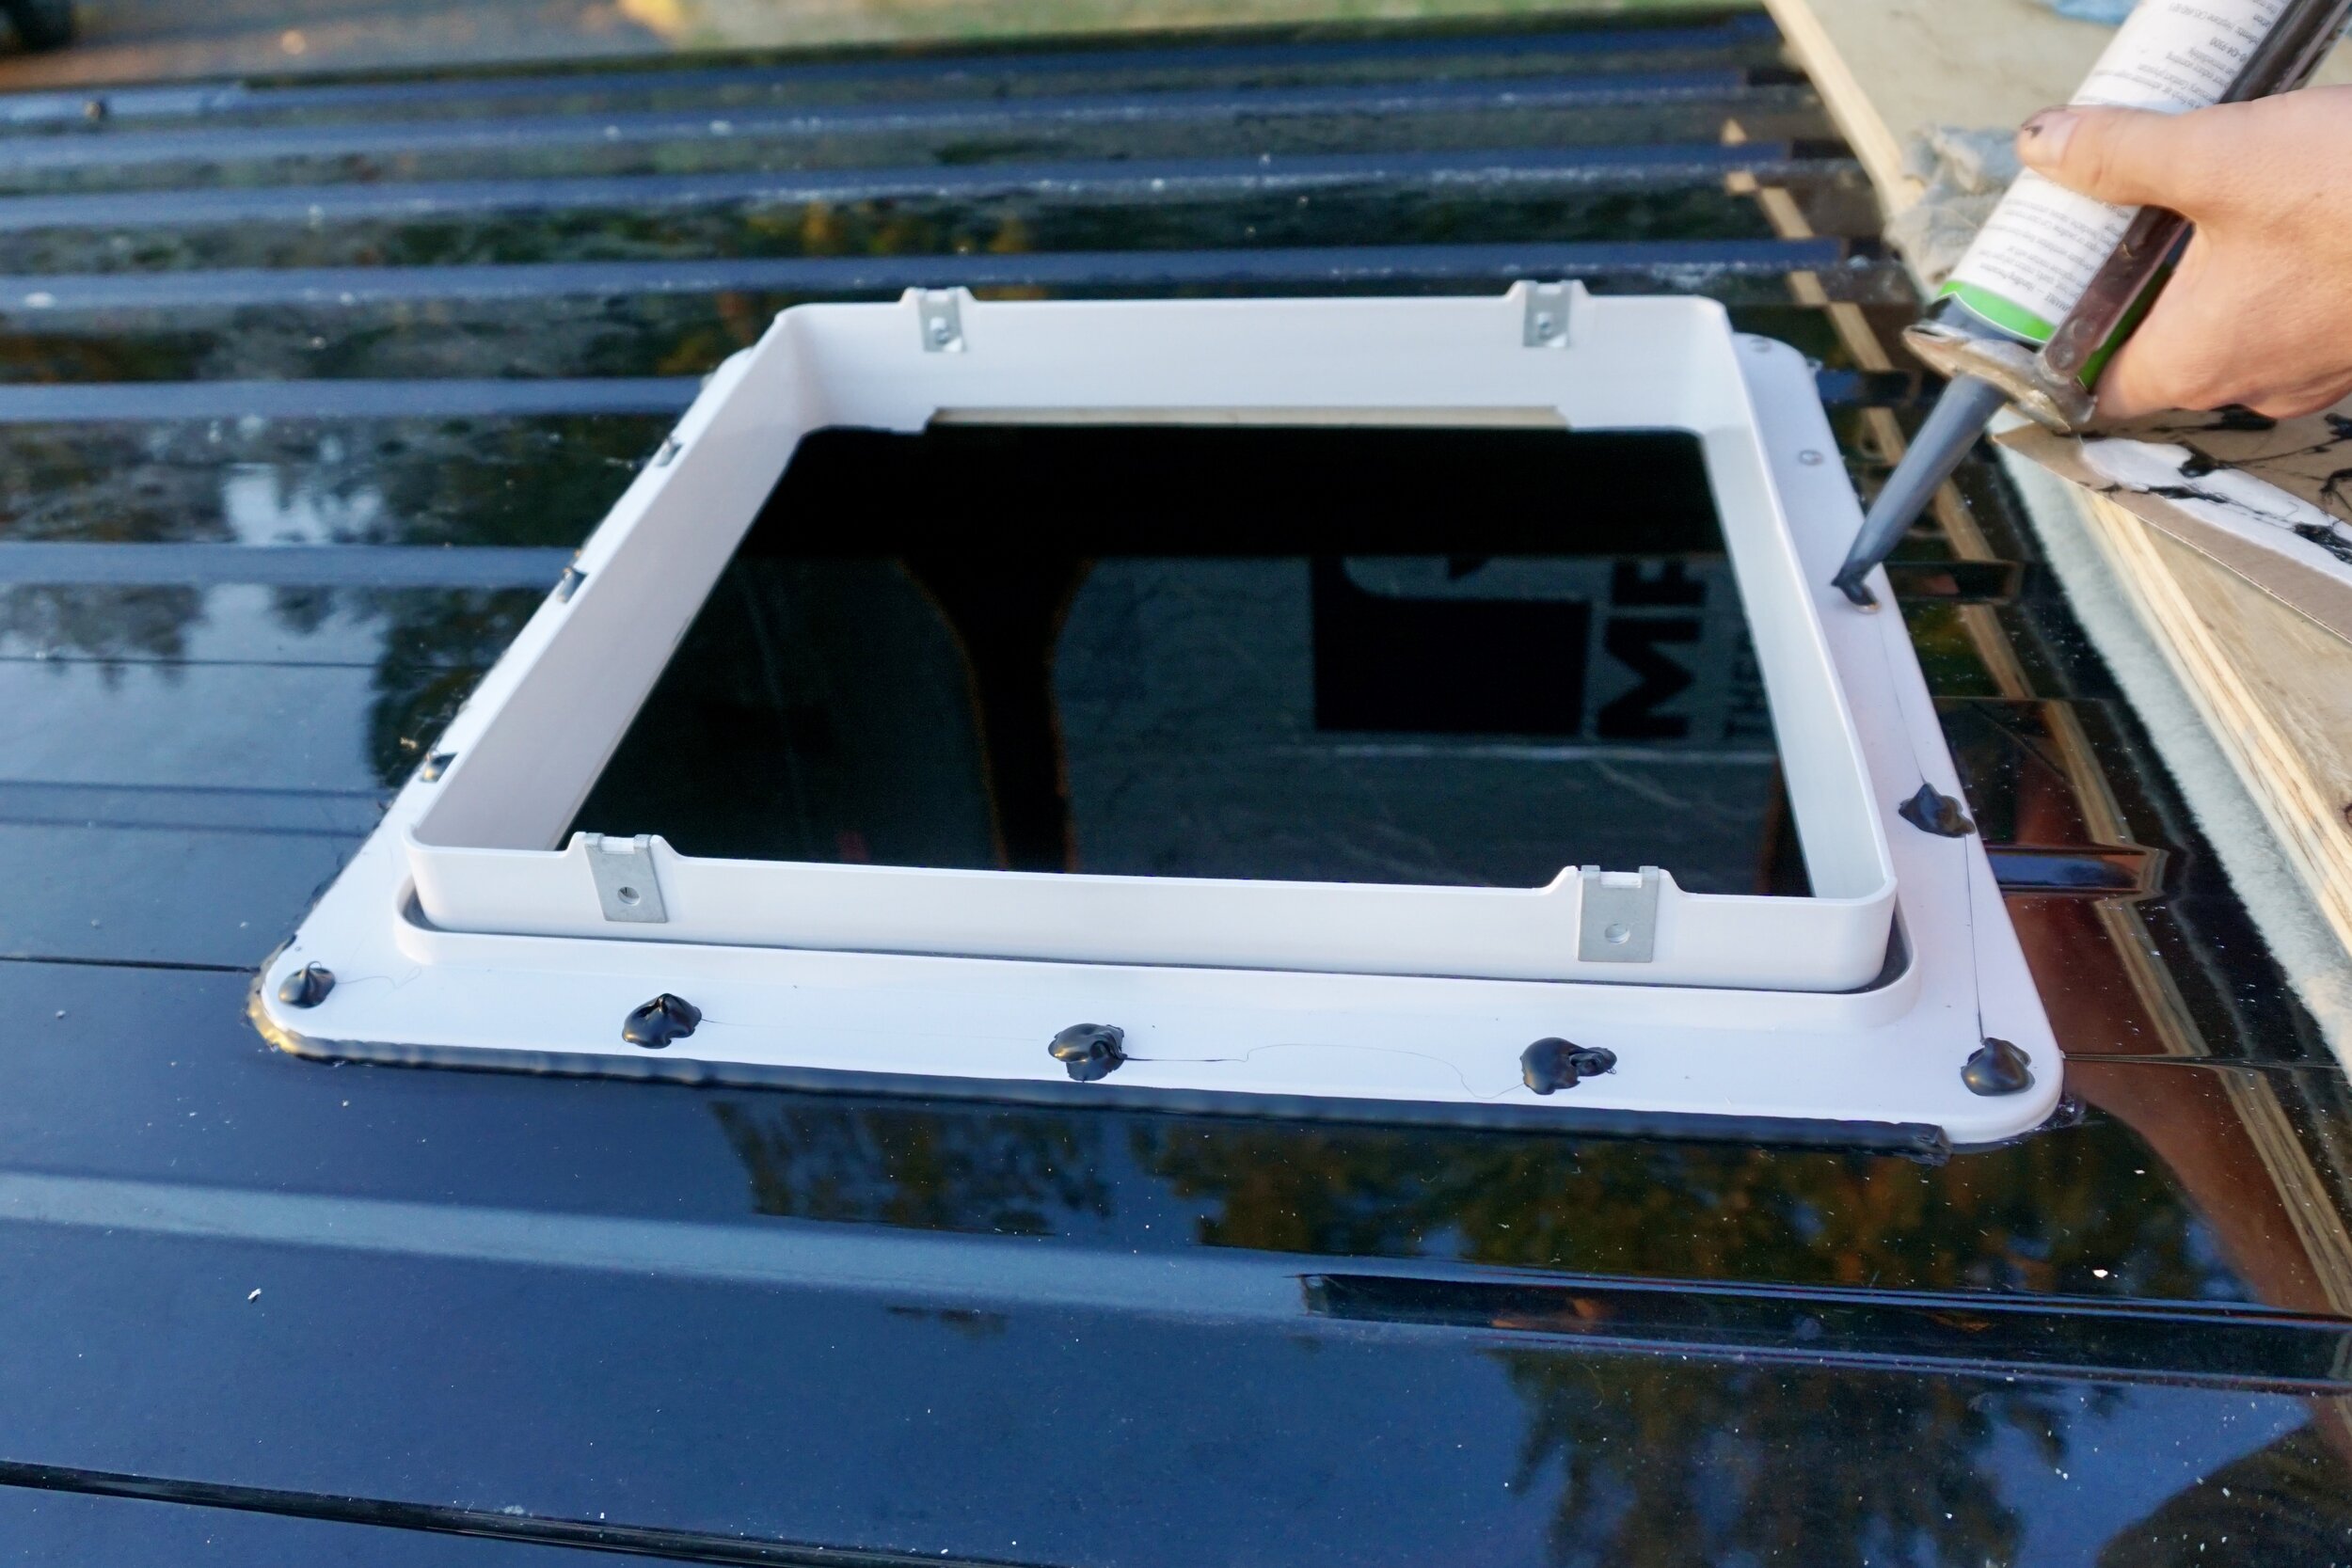
Now that the hole is cut out, prepped, and cleaned, it’s time to install your fan frame. Start by using butyl tape to fill any ribs in the roof of your camper van, and then place a strip along the perimeter of the plastic frame. With the butyl tape in place, now you can drop the frame into the hole. Note: butyl tape is extremely sticky and can be difficult to handle.

Filling in the rib gaps with three layers of butyl tape.
To secure the permanently secure the fan, you’ll need to build a simple wooden frame for the inside of the van. We used a 2x1-inch furring strips for the job, which worked well with the future finish height of our tongue and groove ceiling. Next, use a small pilot drill bit to drill down through the plastic frame (where the existing holes are), through the metal van roof, and into the wooden frame on the inside of the van. With all the pilot holes done, you can now secure it all together by using the screws included with the fan–it’s important to not over-tighten them as you could end up cracking the plastic. Allow it to sit for about an hour and then trim away any excess butyl tape that squeezed out during the process.
Applying Butyl tape the perimeter of the plastic fan frame.
With everything in place, tightened down, and the excess butyl tape trimmed, it’s now time to apply the second layer of weatherproofing. Take the self-leveling lap sealant and seal off the perimeter of the plastic frame. And while probably not 100% necessary, we also think it’s a good idea to place a bead on the head of each screw–it’s an easy task helps ensure proper weatherproofing.
Step Five: Roof Vent Fan Installation
Finally, the moment you’ve been waiting for! The hard work is done and now it’s time to drop the fan into the frame. Doing so is very straight forward and the only thing you really need to watch out for is the wiring, make sure it doesn’t get caught up as you lower the fan in. Once the roof vent fan is in place, secure it to the frame with the included hardware, hook up the wiring, and you’re ready to roll!